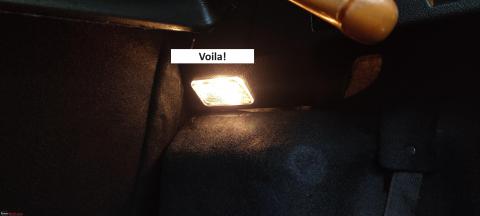
After two days of usage, I have a complaint. The bulb is dim and a LOT of light is being lost to the rear of the lamp into the dead space behind the panel.
BHPian lemedico recently shared this with other enthusiasts.
The Tiago is a DIYer’s dream. I have frequently found bits and bobs to do with the car ever since I got it a year ago. Mine is a 2021 XZA+ AMT DT. The most expensive and supposedly top-specced of the lot. Yet, it lacks so much on the interior and the exterior! One may read through the TeamBHP threads and/or watch my uploads on YouTube for all the DIY I have done so far. A few examples are a front armrest, auto-dimming IRVM, parcel-tray strings and a rear 12v socket.
- Front armrest
- Parcel tray strings
- 12V rear socket
- Auto dimming IRVM
- AMT Hydraulic oil change
- Padded door armrests
This time, I went about installing an OEM boot lamp. Perhaps the older models had one because there are slots for lamps on both the left- and right-hand side. Or maybe it is a panel part shared with the Tigor, which has a boot lamp.
Inspired by this video
and dissatisfied with my own “jugaad” lamp, I went about getting things bought and ready for this DIY. My earlier attempt to Velcro a push-button LED spot lamp was not up to OEM standards, as one may see in this video.
Once again, I found myself heading to the Maruti workshop for a part to be fitted on a Tata car! The lamp is ditto amongst at least these two company’s cars. And it costs much less too. The Tata OEM lamp is Rs. 144 plus a shipping charge and a minimum order value of Rs. 399 from the website.
The identical one from Maruti is ₹96 over the counter! Please note that the shapes of the left and right-side lamps are not similar. This one would only fit in the slot on the right-hand side of the boot.
Other things needed:
- 2.5 metres of wire. This cost me ₹20.
- long flat-head screwdriver
- short cross-head screwdriver
- electrical insulation tape
- super glue/glue gun
- soldering iron, flux, and wire
- optional extra-long laparoscopic forceps to snake the wire through
you may or may not disconnect the battery. I did not.
Start by removing the cabin lamp with a flat-head screwdriver. It comes off easily.
Unscrew two + type screws of the lamp’s frame and pull the lamp’s harness outwards
Snake the wire towards the right-side B-pillar
Take the wire towards the rear C-pillar
Unfasten the panel fascia on the C-pillar. There are two yellow clips that are easily undone with a long flat-head screwdriver.
Bring the wire out through the slot for the lamp and replace the weather strips.
Make the connections on the cabin lamp. The black wire is neutral, and you merely need to slide in some exposed wire to make a connection. There is no need to splice or cut any original wires! Glue them together and tape them up for double security.
Continue reading BHPian Lemdico’s D.I.Y report for more insights and information.
Source: Read Full Article


